Build configuration is a way of arranging, tweaking and changing the settings of a build using a build system. The configuration defines how a build generation process should work, what properties should be applied to the build and what all aspects should be taken care of. In our earlier article, we outlined how to configure Android builds. In this article, we will talk about why developers must configure iOS builds and how to do it. Read on.
Why configure?
- There are various reasons to configure builds. A few of them are;
- If a project requires to support multiple environments like DEV, QA, STAGING and PROD
- If a project requires different build types (like debug and release)
- If a project requires a way to modify dependencies without changing the application source code
- If project requires to have builds automated
- If a project has different API keys for different environments. This might be required for each library integrated within the application
- If a project has a requirement not to commit keys and secrets it uses to source code management system
- If a customer wants builds of different environments to co-exist in the device
These are only a handful. There might be other reasons too.
It’s recommended to store our keys and secrets securely. In a real application, we would either get these from our server or encrypt and store them using standard encryption techniques.
The fields shown here are for demonstration purposes only.
It’s also important not to commit secure configuration properties to SCM (Git/SVN), especially, if SCM is in a public repository.
Utilise techniques such as .gitignore to prevent these from being committed to SCM.
We can also have template config files with only keys (with values being empty) while committing. We can get these inserted to build systems before generating the builds.
How to Configure?
Before jumping onto see how to configure builds in iOS, let’s assume our requirements so that it will be easy for us to scope the discussion. Our assumptions are;
- Our project has three different ENVs (environments) namely, dev (development), stg (staging) and prod (production)
- We want to use different API URLs, keys and secrets for each ENVs
- We want to use different bundle identifiers for each of the ENVs so that, builds with different ENVs can co-exist in a device
- We want to use labelled app icons for dev and staging
Now that we know what all we have to do, let’s dive in to see how to do them.
Xcode provides fantastic support for configuring builds in iOS. It has a build settings pane where we can add/edit build settings, it has a scheme editor pane where we can create multiple schemes and it also provides special type of files with extension .xcconfig to support configuration supply to the build system.
Our application is called Places. It allows users to add and share details of the places they visit. Let’s start by adding three configuration settings files to our project.
Configuration settings files are provided in Xcode for specifying build settings. These files have an extension .xcconfig and are used to define and override build settings for a build configuration of a project or target.
More on these files can be found at https://help.apple.com/xcode/mac/current/#/dev745c5c974
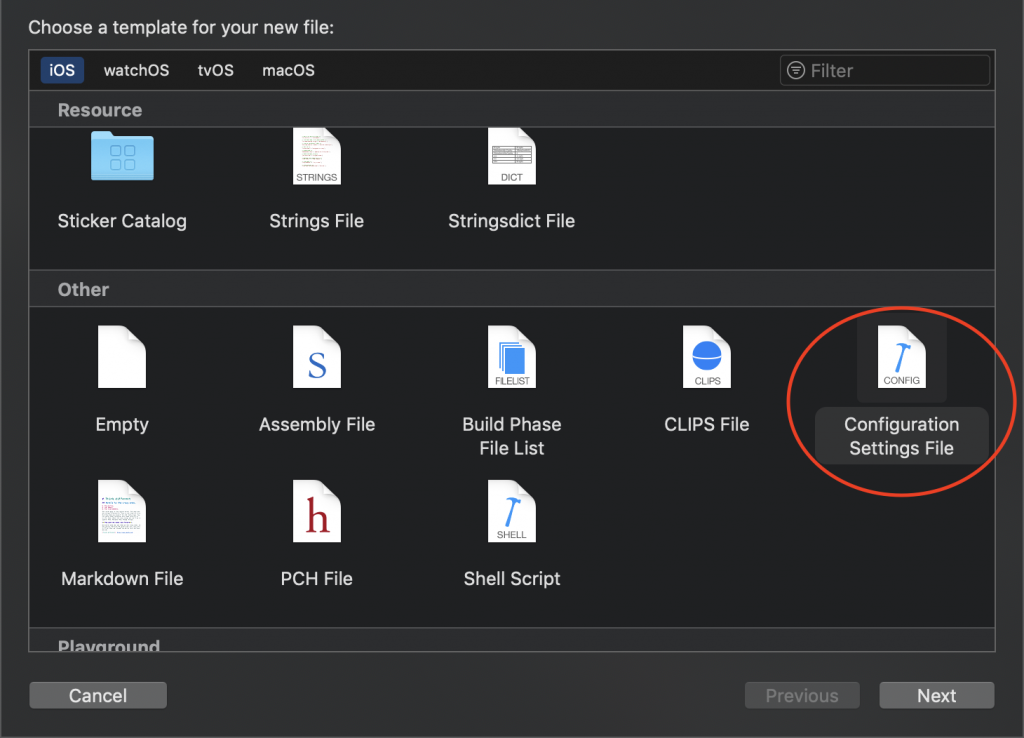
In Xcode, goto menu File → New → File… (or press ⌘N). Locate Configuration Settings File and click Next.
Name it dev.xcconfig. Leave Targets checkbox as is. Click on Create.
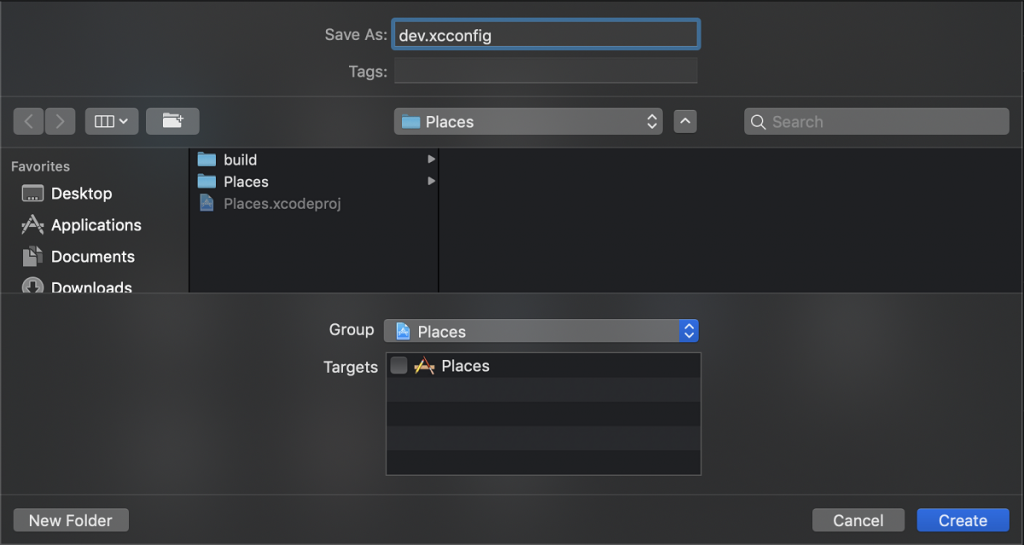
Repeat the above steps to add stg.xcconfig and prod.xcconfig files. These config files we just added are plain text files which can be edited even outside of Xcode. They are ideal for supplying build settings and other configurable properties to the build system without modifying the source code. Hence, if we have a requirement not to commit these config files to SCM, we can omit them.
Contents of these files are key-value pairs and they take the form Key = Value. Various value types are supported. A few of them are – boolean, string, string list, path and path list.
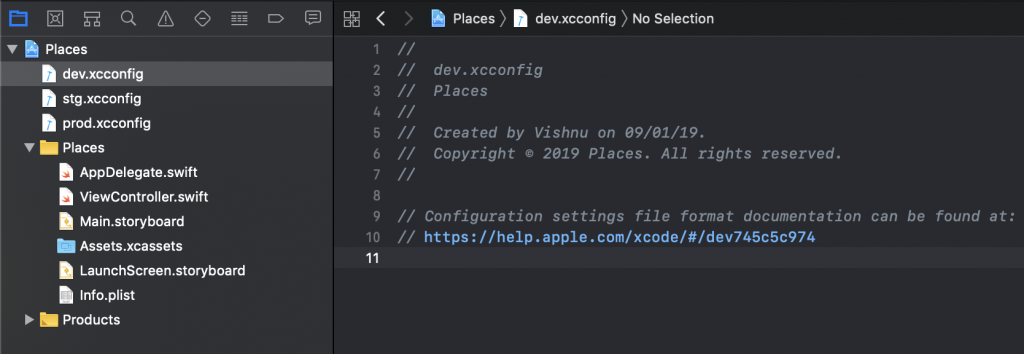
Now that we have added three files, they should look like as shown in below image.
Our app development connects to our server to fetch places data which has three different ENVs namely dev, stg and prod. Hence, the base URLs are;
Dev: http://api.places.com/dev/ (Note the http scheme)
Stg: https://api.places.com/stg/
Prod: https://api.places.com/
Also, we would name our app bundle identifiers as;
Dev: com.places.ios.dev
Stg: com.places.ios.stg
Prod: com.places.ios
As you can see above, the base URLs and bundle identifiers have some components in common. URLs have same host components. Bundle identifiers have com.places.ios as common. Hence, instead of repeating these in all three files, we can have a common.xcconfig file and define them there. Later, we can include this file in all three files.
Add common.xcconfig by following previous steps. Now add the common properties in common.xcconfig so that it looks like below.
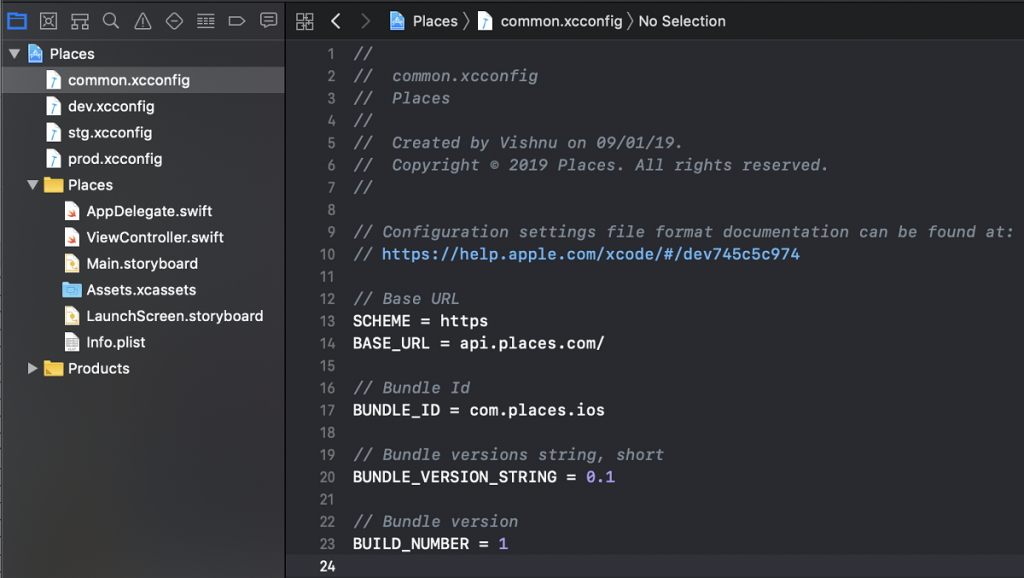
Since our schemes differ for dev and other two configurations, we use a separate SCHEME field in the common.xcconfig and set it to https (imagine it as a default value).
Notice that we have also added BUNDLE_VERSION_STRING and BUILD_NUMBER fields to the common.xcconfig. Moving forward, we can change application version and build number directly from config file.
Now, let’s include these in other three files and add ENV specific properties. Our dev.xcconfig now looks like below.
#include "common.xcconfig"

SCHEME = http

// ENV specific
ENV_NAME = dev

// Bundle Id suffix
BUNDLE_ID_SUFFIX = .$(ENV_NAME)

// API path
API_PATH = $(ENV_NAME)/

// Analytics API key and secret
ANALYTICS_API_KEY = 783fa804f48d2952c22bf6653ce4474f
ANALYTICS_API_SECRET = f93754758b5b7f242f89b8d38223e836
#include statement in the first line imports build configurations from common.xcconfig file. Property ENV_NAME is assigned a value of dev so that, this can be substituted in other required places. Notice how we are substituting value of ENV_NAME property to BUNDLE_ID_SUFFIX and API_PATH properties using $() syntax. Later, we are going to construct complete base URL and bundle identifiers using these respectively. Last two lines represent API key and secret required by the analytics SDK we are planning to integrate. As we want to keep analytics specific to ENVs, we use different keys and secrets for dev, stg and prod. Similarly, if we have any other ENV specific properties, we can add them to respective .xcconfig files.
Below are the contents of stg.xcconfig file
#include "common.xcconfig"

// ENV specific
ENV_NAME = stg

// Bundle Id suffix
BUNDLE_ID_SUFFIX = .$(ENV_NAME)

// API path
API_PATH = $(ENV_NAME)/

// Analytics API key and secret
ANALYTICS_API_KEY = 8b383b32443c343d8e97ae2a2cbbb986
ANALYTICS_API_SECRET = e335d54b5043dcda6ee13a688a7539fc
and prod.xcconfig file.
#include "common.xcconfig"

// ENV specific
ENV_NAME =

// Bundle Id suffix
BUNDLE_ID_SUFFIX =

// API path
API_PATH =

// Analytics API key and secret
ANALYTICS_API_KEY = b76748fc63ede06d366f0e55cb447ded
ANALYTICS_API_SECRET = 78e6376ebbab8cf71c5cbc388e7f24cb
Notice in prod.xcconfig, we have omitted BUNDLE_ID_SUFFIX and API_PATH values, as they are not required (Remember, our prod URL is api.places.com/ and prod bundle id is com.places.ios, which are already mentioned in common.xcconfig). Also note that, we haven’t added SCHEME field in neither stg nor prod configs. They take the default value of https mentioned in common.xcconfig.
In case you have same schemes (say https) for all ENVs, we can construct the URL with scheme and host together in a single BASE_URL field like https://api.places.com/
However, there is a catch. Settings configuration files do not directly support URLs. If you try adding a full URL with scheme and host as above, substring that starts with // is treated as comment and when it’s read we will only see https:
Even wrapping them in double quotes does not work.The solution is to use a dirty trick to reconstruct the URL as below.
BASE_URL = https:/$()/api.places.com/
The $() above substitutes the empty string in between forward slashes.
Now that we have added and filled our config files, let’s inform Xcode where to use them. Go to project navigator, click on your project file and in the editor area, select Places under PROJECT section as shown below.
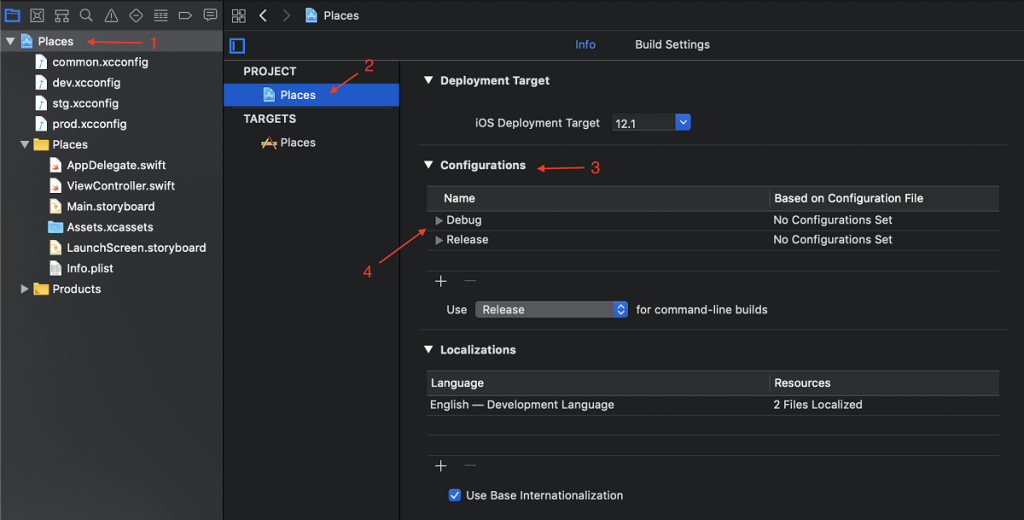
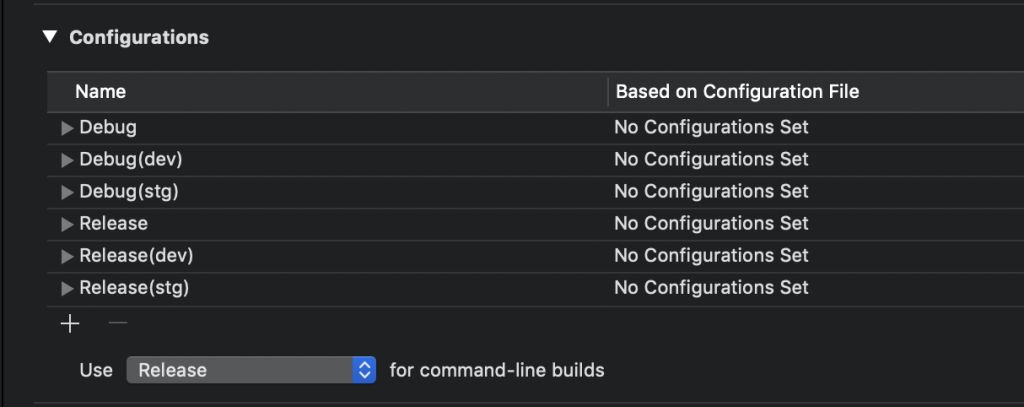
In the above image, under Info tab, notice the Configurations section marked as #3. It already contains Debug and Release as two default configurations (#4). Since we have three different ENVs, we would like to have Debug and Release configurations for each of the ENVs. Click on the + button below the Configuration section and select Duplicate “Debug” Configuration option. A new configuration named Debug copy will be created in an editable format .Change the name of the configuration to Debug(dev). Similarly, create one more copy of Debug and rename it to Debug(stg).
Repeat the same process to create two copies of Release configuration (by selecting Duplicate “Release” Configuration option) and name them Release(dev) and Release(stg). Now we have created Debug and Release configurations corresponding to dev and stg ENVs. Let’s keep the original Debug and Release configurations for prod. Once completed, they look like as shown in the image below.
Now, let’s link our .xcconfig files to these configurations we just created. Click on the small disclosure triangle placed left to Debug configuration. When it is disclosed, it shows a project file and a target below it. Click on the popup button in front of the project file and select prod from the options. Similarly, disclose Debug(dev) and choose dev from the popup in front. Repeat this for all the configurations so that the section looks like as shown in below image.
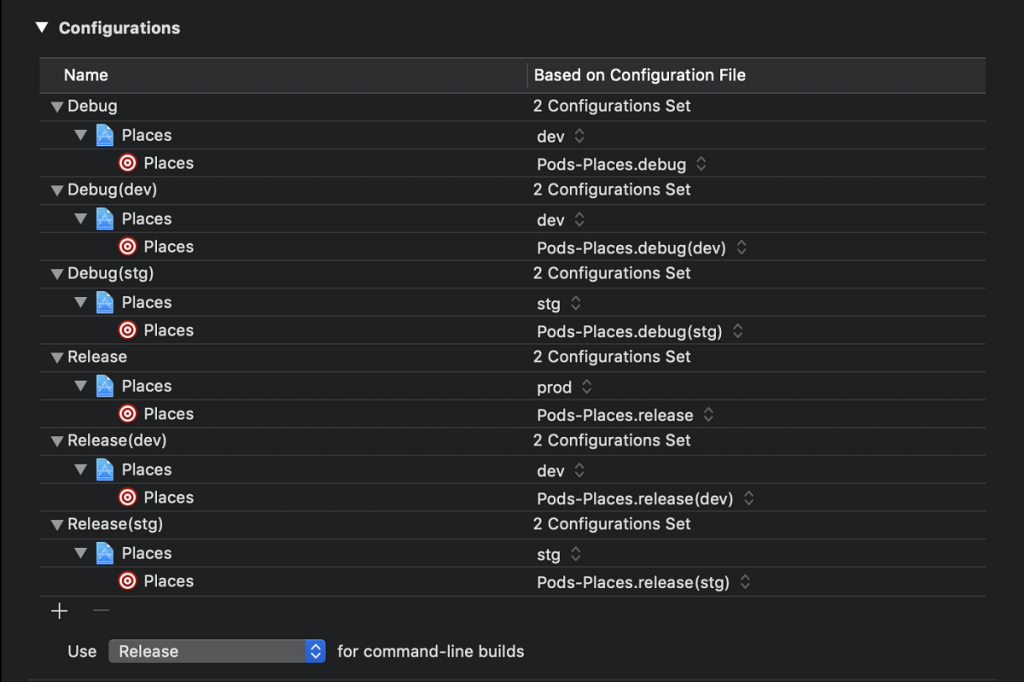
In the above image, under each configuration, we have a project file icon and a target icon. It’s possible to have multiple targets under the one project. We are adding our settings configuration files at project level. This indicates, the target under that project also gets those settings.
By default, project level settings are carried over to targets belonging to the project. However, each target can override these settings if needed.
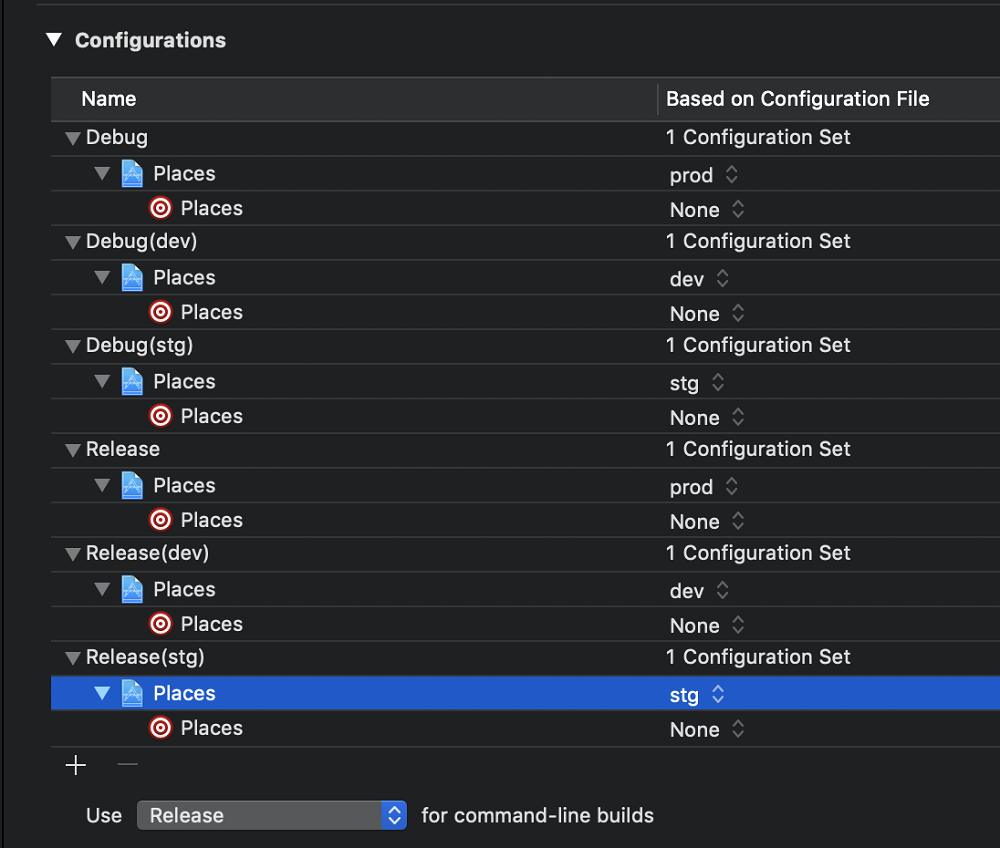
In case we are planning to use CocoaPods for our dependencies, then target specific .xcconfig files are added by CocoaPods automatically.
Let’s add Crashlytics to our project using CocoaPods. Close the Xcode project if it’s open already. Open a terminal window and cd to our projects base directory. Create a Podfile using command below (assuming our project directory is in user’s Desktop directory).
Vishnus-MacBook-Pro:~ vishnu$ cd ~/Desktop/Places
Vishnus-MacBook-Pro:Places vishnu$ vi Podfile
In the window that opens vi editor, enter character i so that vi goes into edit mode. Enter below code.
platform :ios, ‘10.0’
target ‘Places’ do
use_frameworks!pod ‘Fabric’
pod ‘Crashlytics’
end
Press ESC key then : (colon). At the colon prompt that appears, enter wq keys to save and quit vi. Now do a pod install. Terminal looks as below.
Vishnus-MacBook-Pro:~ vishnu$ pod install
Analyzing dependencies
Downloading dependencies
Using Crashlytics (3.10.2)
Using Fabric (1.7.7)
Generating Pods project
Integrating client project
Sending stats
Pod installation complete! There are 2 dependencies from the Podfile and 2 total pods installed.
Vishnus-MacBook-Pro:Places vishnu$
Now go to the project base folder in the Finder and open Places.xcworkspace file by double clicking it. From now on, we’ll use Places.xcworkspace to open our project instead of Places.xcodeproj.
If you are configuring an existing project which already has CocoaPods integrated, just delete <ProjectName>.xcworkspace, Podfile.lock and Pods folder and redo a pod install. This will recreate pod specific .xcconfig files.
Now if we open our .xcworkspace file and check configurations section, pod specific .xcconfigs will be added for each target, as shown in below image.
Now that we have our configurations ready, let;’s check where these are available for us as settings. Select project file in navigation area → select Places under TARGETS section → select Build Settings tab → scroll down to User-Defined section, as shown in the image below. All fields added in .xcconfig files will be available here.
![]()
We have added these as build settings. So, they will be available for the build system while building. But, we need to access some of these in code (ex: BASE_URL). For this, we’ll have to expose these to our Info.plist file, so that those fields can be available to us at runtime. Let’s add those fields to our Info.plist file by editing it (We can add new entries by going to Editor menu → Add Item or by Control click → Add Row).
After this, our Info.plist looks like as shown in the image below.
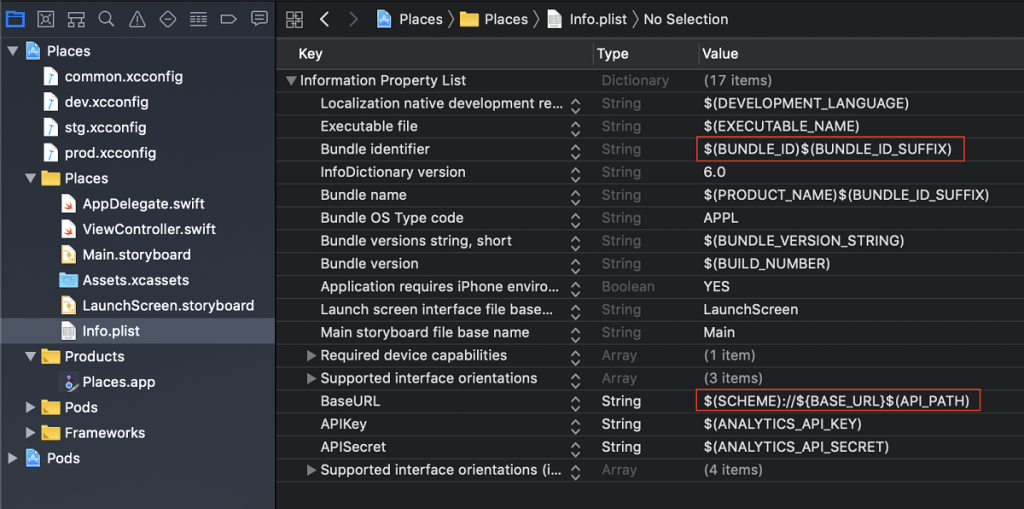
We have added BaseURL, APIKey and APISecret entries and substituted values from build configurations. Notice how values are constructed from components to make final values.
BaseURL has a value $(SCHEME)://${BASE_URL}$(API_PATH)
If we take dev.xcconfig values and replace above keys, we get http://api.places.com/dev/
Similarly, we have edited few existing keys to give new values from our .xcconfig files. We have modified Bundle identifier, Bundle name, Bundle version string, short and Bundle version so that we can control these from our configs.
Now that we have our Info.plist ready, let’s see how we can make it update based on the ENVs that we have. Also, let’s examine how to generate builds based on ENVs. Notice that, above we have modified our Info.plist to name our application based on ENV, that is, $(PRODUCT_NAME)$(BUNDLE_ID_SUFFIX) (Ex: Places.dev, Places.stg).
Select scheme menu at the top left corner of the Xcode toolbar and choose Manage Schemes… as shown in the image below.

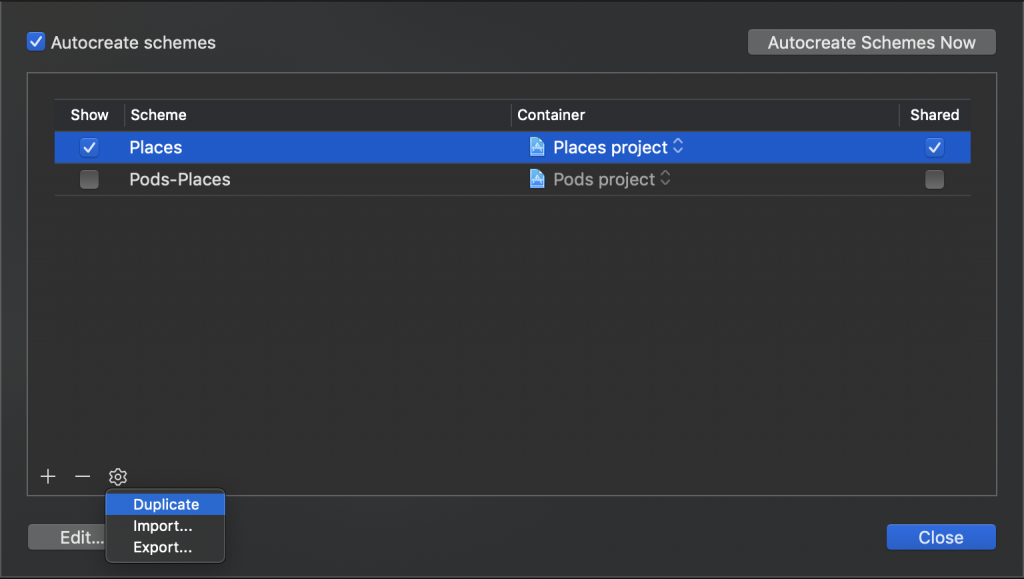
In the window that opens, select Places row and click on gear icon below. Select Duplicate as shown below.
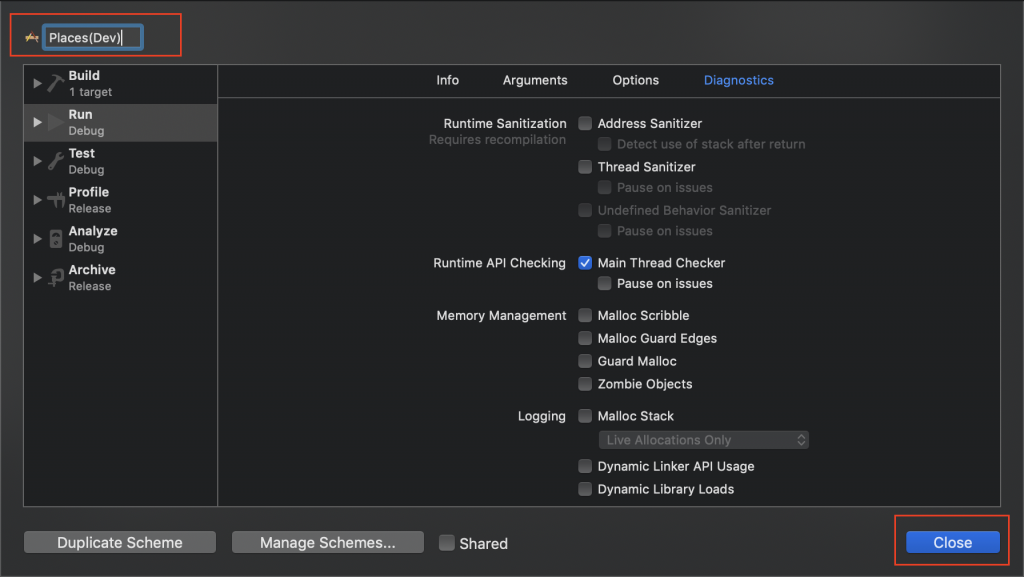
In the new panel that opens with editable name field, rename scheme to Places(Dev) and click Close button as shown below.
Repeat the above steps to create Places(Stg) scheme. When done, the list of schemes will be as shown in below image.
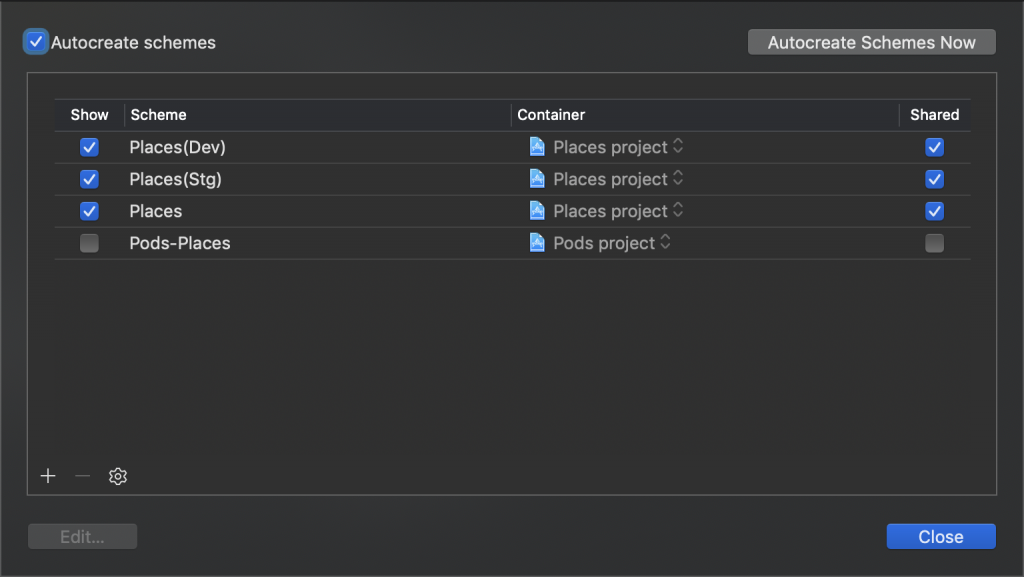
Notice the Shared column with checkboxes in the image above. Make sure they are checked for all the schemes we added. If these are unchecked, the schemes will not be available to others, when you check-in your code.
Now, we need to define the build types for each of the tasks. Double-lick on the Places(Dev) row above to go to the edit scheme screen. For each of the tasks listed in left, change the build configuration to respective configuration, as shown in the example image below.
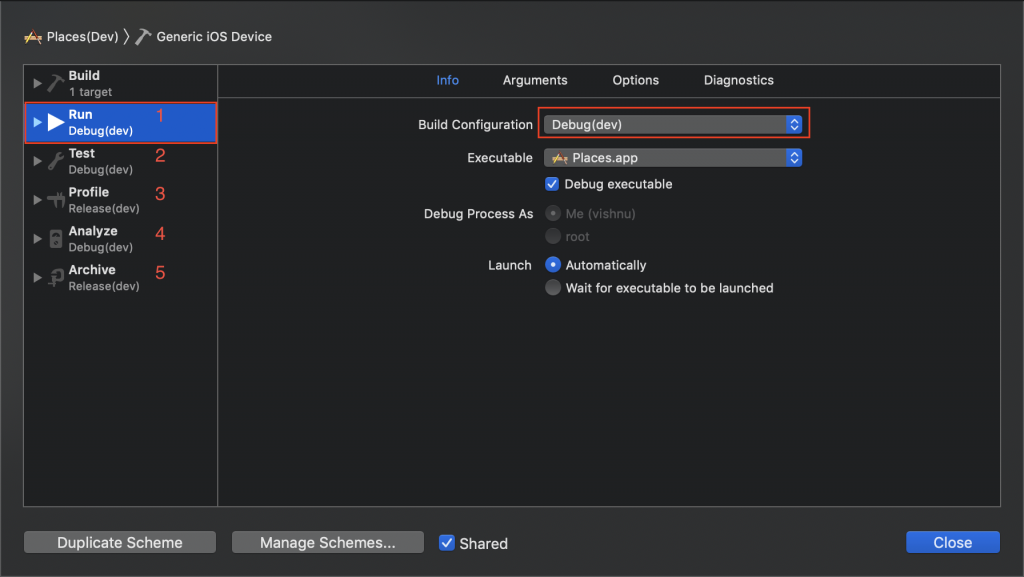
Run → Info tab → Build Configuration → Select Debug(dev)
Test → Info tab → Build Configuration → Select Debug(dev)
Profile → Info tab → Build Configuration → Select Release(dev)
Analyze → Build Configuration → Select Debug(dev)
Archive → Build Configuration → Select Release(dev)
Repeat the above steps for Places(Stg) scheme as well.
Once the scheme editing is done, let’s see if things we have done till now are in place. Let’s try to access keys we have added in our Info.plist so that we can verify if we are getting expected values at runtime. Open ViewController.swift file and change viewDidLoad method to look like below.
override func viewDidLoad() {
    super.viewDidLoad()
    // Do any additional setup after loading the view, typically from a nib.

    print("Name: (Bundle.main.infoDictionary?["CFBundleName"]! ?? "")")
    print("Version: (Bundle.main.infoDictionary?["CFBundleShortVersionString"]! ?? "")")
    print("Build#: (Bundle.main.infoDictionary?["CFBundleVersion"]! ?? "")")
    print("Base URL: (Bundle.main.infoDictionary?["BaseURL"]! ?? "")")
    print("API Key: (Bundle.main.infoDictionary?["APIKey"]! ?? "")")
    print("API Secret: (Bundle.main.infoDictionary?["APISecret"]! ?? "")")
  }
Select Places(Dev) from the scheme menu and run the application. You will see logs like below in the console.
Name: Places.dev
Version: 0.1
Build#: 1
Base URL: http://api.places.com/dev/
API Key: 783fa804f48d2952c22bf6653ce4474f
API Secret: f93754758b5b7f242f89b8d38223e836
These output values correspond to the values we have configured for the dev.xcconfig file. Try selecting other schemes from scheme menu and observe the output. We can also observe that, once these schemes are run, three separate apps co-existing in the device/simulator.
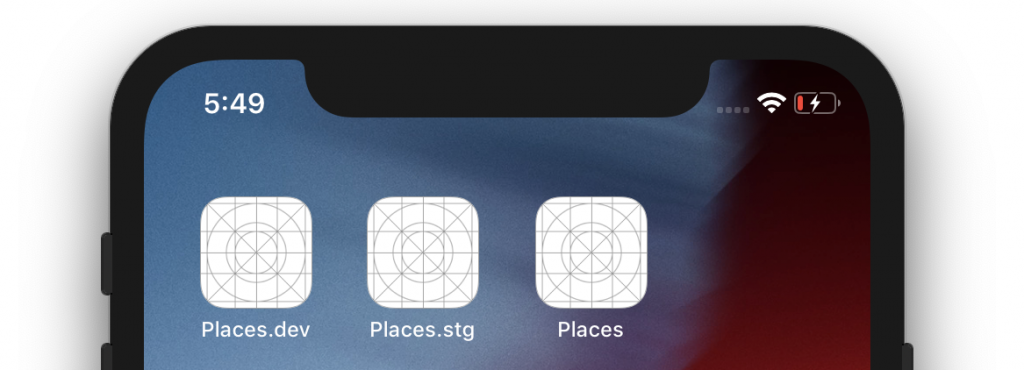
Those icons are default and not looking great. Let’s see how we can add scheme specific icons now.
Open Assets.xcassets folder in Xcode sidebar and click on AppIcon and drag & drop all the icons for prod scheme as shown below.
![]()
To add dev and stg icons, create a new iOS App Icon set, by clicking + button below, select App Icons & launch Images → New iOS App Icon. Rename it to AppIcon-dev as shown in below image. Add all icons. Repeat the above steps to create AppIcon-stg app icon set as well.
![]()
Finally, let Xcode know which app icon set to use for each build. Open target settings → select Build Settings tab, search for AppIcon. In the Asset Catalog App Icon Set Name settings, edit the app icon set names for respective configurations as shown below.
![]()
Build and run all the schemes to see three separate apps installed on the device/simulator with respective icons (Preview app in OS X can be used to add labels on the icons).
![]()
One last thing related to configuration. Sometimes, we might need to include bespoke files based on environments in the build. One such example is GoogleService-Info.plist file which we download from google console and include in the project, for google API services. In case we need to maintain separate GoogleService-Info.plist file, one per environment, then we can achieve this by creating a custom run script build phase in Xcode.
Start by creating three folders inside your project target directory namely dev, stg and prod. Copy respective GoogleService-Info.plist files downloaded from Firebase to respective directories created.

In Xcode, go to project target, select Build Phases tab and click on the + button, select New Run Script Phase as shown below. Rename the run script phase to Copy GoogleService-Info.plist.

Expand the disclosure triangle to edit the run script phase. In the script editor area, add the script to copy respective GoogleService-Info.plist file to the app bundle as shown below.
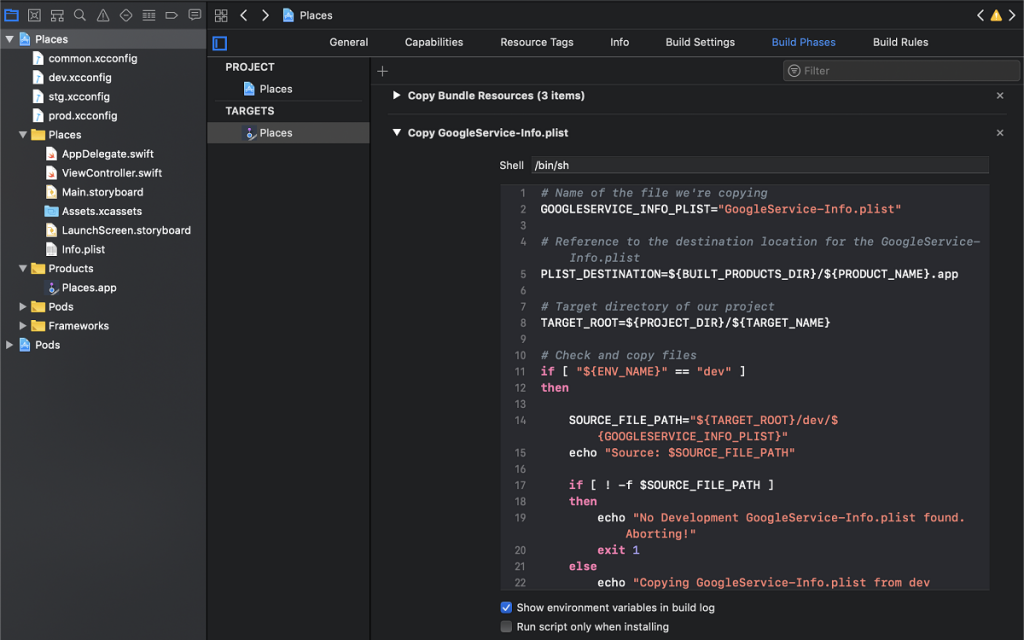
Below is the script to copy file.
# Name of the file we're copying
GOOGLESERVICE_INFO_PLIST="GoogleService-Info.plist"

# Reference to the destination location for the GoogleService-Info.plist
PLIST_DESTINATION=${BUILT_PRODUCTS_DIR}/${PRODUCT_NAME}.app

# Target directory of our project
TARGET_ROOT=${PROJECT_DIR}/${TARGET_NAME}

# Check and copy files
if [ "${ENV_NAME}" == "dev" ]
then

    SOURCE_FILE_PATH="${TARGET_ROOT}/dev/${GOOGLESERVICE_INFO_PLIST}"
    echo "Source: $SOURCE_FILE_PATH"

    if [ ! -f $SOURCE_FILE_PATH ]
    then
        echo "No Development GoogleService-Info.plist found. Aborting!"
        exit 1
    else
        echo "Copying GoogleService-Info.plist from dev directory"
        cp "${SOURCE_FILE_PATH}" "${PLIST_DESTINATION}"
    fi

elif [ "${ENV_NAME}" == "stg" ]
then

    SOURCE_FILE_PATH="${TARGET_ROOT}/stg/${GOOGLESERVICE_INFO_PLIST}"
    echo "Source: $SOURCE_FILE_PATH"

    if [ ! -f $SOURCE_FILE_PATH ]
    then
        echo "No Staging GoogleService-Info.plist found. Aborting!"
        exit 1
    else
        echo "Copying GoogleService-Info.plist from stg directory"
        cp "${SOURCE_FILE_PATH}" "${PLIST_DESTINATION}"
    fi

else
    SOURCE_FILE_PATH="${TARGET_ROOT}/prod/${GOOGLESERVICE_INFO_PLIST}"
    echo "Source: $SOURCE_FILE_PATH"

    if [ ! -f $SOURCE_FILE_PATH ]
    then
        echo "No Production GoogleService-Info.plist found. Aborting!"
        exit 1
    else
        echo "Copying GoogleService-Info.plist from prod directory"
        cp "${SOURCE_FILE_PATH}" "${PLIST_DESTINATION}"
    fi
fi
This article was in continuation of – Configuring Android Builds – a Step-by-Step Guide.


